Integrate a Waitlist into your HTML Website
Integrating a waitlist into your HTML website is one of the most straightforward, and the simplest method of integration. This guide teaches you how to properly integrate a no-code Waitlist Widget into your HTML website.
Integration Guide
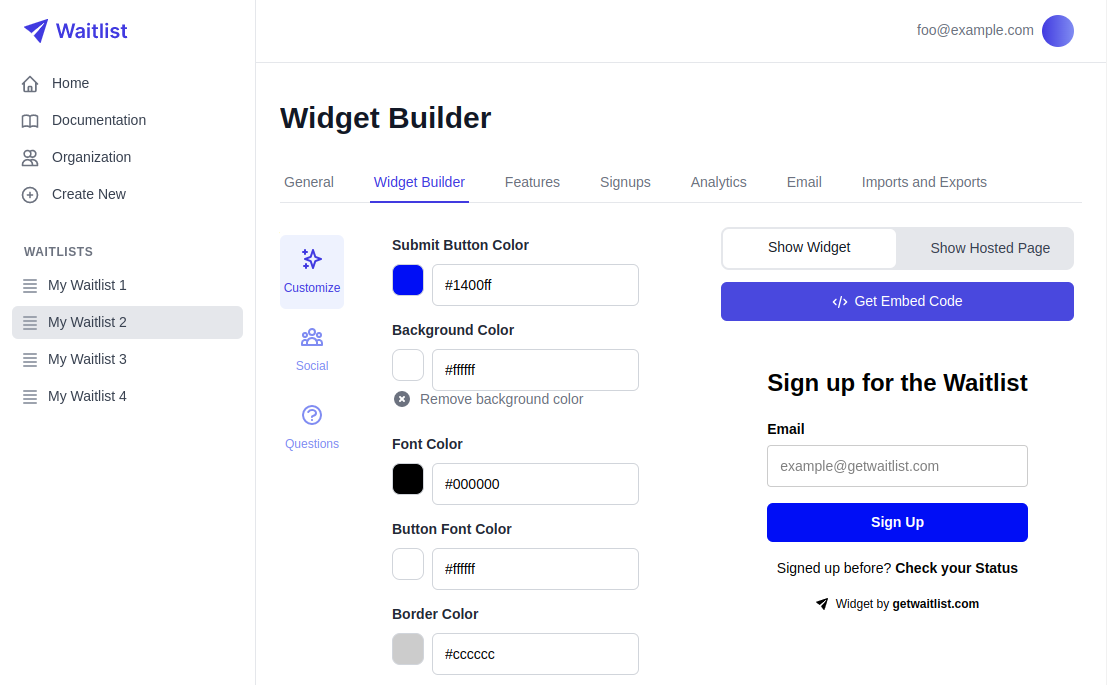
- Access the Widget Builder: First, you need to access the Widget Builder in your Waitlist Dashboard. This is where you will configure and customize your waitlist widget.
-
Log in to your Waitlist Account: Navigate to your Waitlist Dashboard.
-
Select Your Waitlist: Choose the waitlist you want to integrate.
-
Open the Widget Builder: Click on the "Widget Builder" tab in the sidebar.
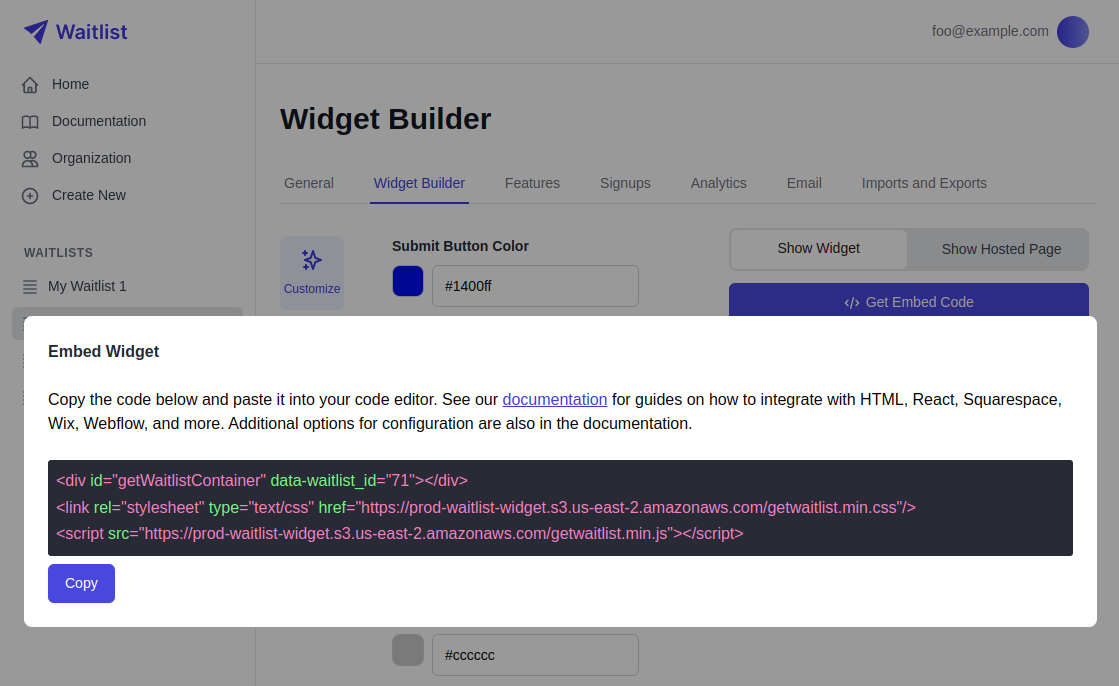
- Get the Embed Code: The window that pops up will give you a small code snippet to copy. Click the copy button.
-
Customize Your Widget: Adjust the appearance and settings of your widget to match your website's style.
-
Generate the Embed Code: Click the "Get Embed Code" button. This will open a window with a code snippet.
-
Copy the Embed Code: The window that pops up will give you a small code snippet to copy. Click the copy button to copy the snippet to your clipboard, and paste the snippet into your code editor, wherever makes sense for the Waitlist to be on the page. Importantly, you need to paste the three lines exactly in the same order.

-
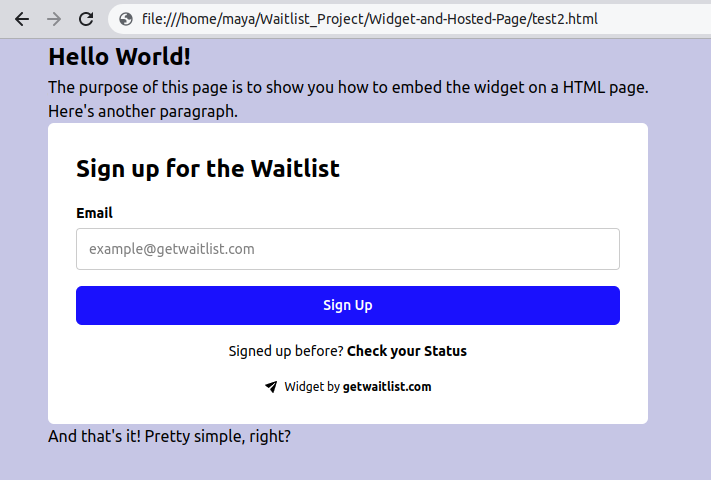
Test Your Integration: Open your HTML file in a web browser to test the integration. You should see the waitlist widget displayed on your page.
Copy-Pastable Code Example
Copy-pastable Code
    <html>
    <head>
        <title>
            This is a Test Page for the GetWaitlist Instructions
        </title>
    </head>
    <body style='background-color: #c6c6e6; margin-left: 3rem;'>
    <div style="font-weight: bold; font-size: 24px;">
        Hello World!
    </div>
    <p>
        The purpose of this page is to show you how to embed the widget on a HTML page.
    </p>
    <p>
        Here's another paragraph.
    </p>
    <div id="getWaitlistContainer" data-waitlist_id="71"></div>
    <link rel="stylesheet" type="text/css" href="https://prod-waitlist-widget.s3.us-east-2.amazonaws.com/getwaitlist.min.css"/>
    <script src="https://prod-waitlist-widget.s3.us-east-2.amazonaws.com/getwaitlist.min.js"></script>
    </p>
    And that's it! Pretty simple, right?
    <p>
    </body>
    </html>
Customization
For more waitlist form customization, check out the Widget Embed Options.
Troubleshooting
Common Issues and Solutions
- Widget Not Displaying: Ensure you have pasted the code snippet correctly and that your internet connection is active.
- Styling Issues: Check for conflicting CSS styles on your webpage. Use browser developer tools to inspect and debug CSS issues.
- JavaScript Errors: Open the browser console to check for any JavaScript errors. Ensure the script URL is correct and that there are no typos in the code snippet.
Frequently Asked Questions
- What browsers are supported?: The waitlist widget is designed to work on all modern web browsers, including Chrome, Firefox, Safari, and Edge.
- Can I integrate the widget into a CMS?: Yes, you can integrate the waitlist widget into any CMS that allows you to edit the HTML directly, such as WordPress, Joomla, or Drupal.
- Is the widget mobile-friendly?: Yes, the waitlist widget is fully responsive and will adapt to different screen sizes, including mobile devices.
- How can I track the performance of my waitlist?: You can track the performance of your waitlist through the analytics dashboard in your Waitlist account. Here you can see metrics such as the number of sign-ups, conversion rates, and user engagement.